Sunday, May 30, 2010
Beatty's Chocolate Cake - week 22 of 52
All dinners must end in dessert and as this is the last week of my Barefoot Contessa chef series, I made “Beatty’s Chocolate Cake” from Ina Garten’s “Barefoot Contessa at Home” cookbook. There’s always room for dessert since it goes in a separate compartment in your tummy!
In her book the Barefoot Contessa recounts the origins on this recipe. Her friend’s grandfather used to have a milk route in Pennsylvania Dutch country and his grandmother would make this cake for him to deliver to customers with their milk. Her friend’s grandmother was definitely onto something – this cake would go perfectly with a cold glass of milk!
I had a friend and her parents over yesterday and I served this chocolate cake with tea and it was a huge hit! The cake is rich, but still light in texture and the flavour is incredible! I suspect the wonderful texture is due the buttermilk in the recipe. This is one of my new favourites now – I may try to make cupcakes with the batter next time.
When I made the frosting it seemed a little too thin. That’s probably due to the fact that we’ve had some really hot weather and it made the butter that I left overnight to warm to room temperature a little too soft. After I spread the frosting onto the cake, I put the entire cake into the fridge and the frosting hardened up – problem solved!
Did you know (stuff I learnt along the way): Buttermilk is the liquid left behind when making butter or also refers to a fermented milk product. The fermented milk is made by turning the milk sugars into lactic acid, which causes the milk proteins to solidify. This makes buttermilk be thicker than regular milk – the tangy flavour is from the lactic acid.
This cake definitely “takes the cake”!
Bonne appétit!
Beatty's Chocolate Cake - serves 12
$$
Ingredients
• Butter, for greasing the pans
• 1 3/4 cups all-purpose flour, plus more for pans
• 2 cups sugar
• 3/4 cups good cocoa powder
• 2 teaspoons baking soda
• 1 teaspoon baking powder
• 1 teaspoon kosher salt
• 1 cup buttermilk, shaken
• 1/2 cup vegetable oil
• 2 extra-large eggs, at room temperature
• 1 teaspoon pure vanilla extract
• 1 cup freshly brewed hot coffee
Directions
Chocolate Buttercream, recipe follows
Preheat the oven to 350 degrees F. Butter 2 (8-inch) round cake pans. Line with parchment paper, then butter and flour the pans. *Note – since this is a chocolate cake, I used cocoa to “flour” the pans instead so the cakes would not get a dusting of flour on the outside.
Sift the flour, sugar, cocoa, baking soda, baking powder, and salt into the bowl of an electric mixer fitted with a paddle attachment and mix on low speed until combined. In another bowl, combine the buttermilk, oil, eggs, and vanilla. With the mixer on low speed, slowly add the wet ingredients to the dry. With mixer still on low, add the coffee and stir just to combine, scraping the bottom of the bowl with a rubber spatula. Pour the batter into the prepared pans and bake for 35 to 40 minutes, until a cake tester comes out clean. Cool in the pans for 30 minutes, then turn them out onto a cooling rack and cool completely.
Place 1 layer, flat side up, on a flat plate or cake pedestal. With a knife or offset spatula, spread the top with frosting. Place the second layer on top, rounded side up, and spread the frosting evenly on the top and sides of the cake.
Chocolate Frosting
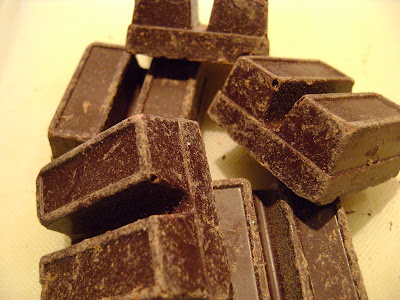
• 6 ounces good semisweet chocolate (recommended: Callebaut)
• 1/2 pound (2 sticks) unsalted butter, at room temperature
• 1 extra-large egg yolk, at room temperature
• 1 teaspoon pure vanilla extract
• 1 1/4 cups sifted confectioners' sugar
• 1 tablespoon instant coffee powder
Chop the chocolate and place it in a heat-proof bowl set over a pan of simmering water. Stir until just melted and set aside until cooled to room temperature.
In the bowl of an electric mixer fitted with a paddle attachment, beat the butter on medium-high speed until light yellow and fluffy, about 3 minutes. Add the egg yolk and vanilla and continue beating for 3 minutes. Turn the mixer to low, gradually add the confectioners' sugar, then beat at medium speed, scraping down the bowl as necessary, until smooth and creamy. Dissolve the coffee powder in 2 teaspoons of the hottest tap water. On low speed, add the chocolate and coffee to the butter mixture and mix until blended. Don't whip! Spread immediately on the cooled cake.
Sunday, May 23, 2010
Good eats!
I was exploring the Queen St West neighbourhood and wanted to share a new "good eats". A new patisserie called Nadège has opened and they have the best croissants ever! I bought a almond chocolate croissant – it was flakey, rich & simply perfect!
The chef/ owner, Nadege Nourian, apparently worked in London as an assistant executive chef in a London Michelin rated restaurant. Martini Boys has a great review on this neighbourhood patisserie.
Nadège is a beautiful space and I will definitely go back to try some more of their treats!
Bonne appétit!
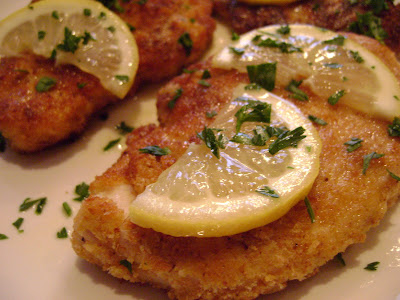
Chicken Piccata - Ina Garten- week 21 of 52
This week's recipe was a recommendation from a co-worker in the US. I was visiting our head office in Connecticut last week and one of my US co-workers suggested I make the chicken piccata from Barefoot Contessa’s cookbook. A great suggestion!
Chicken piccata is a Italian dish made of tenderized chicken breasts which are breaded and pan-fried. The chicken is accompanied by a lemon, butter & white wine sauce.
This has got to be one of my new favourites – it is easy, elegant & delicious – very much the Barefoot Contessa style! Don't worry about the sauce being to "lemoney" - the wine & butter help cut down on the tartness. I will definitely be making this one again.
Bonne appétit!
Next week will be the last of the Barefoot Contessa chef series. A decadent dessert will be the feature.
Chicken Piccata
Ingredients
$$
• 2 split (1 whole) boneless, skinless chicken breasts
• Kosher salt and freshly ground black pepper
• 1/2 cup all-purpose flour
• 1 extra-large egg
• 1/2 tablespoon water
• 3/4 cup seasoned dry bread crumbs
• Good olive oil
• 3 tablespoons unsalted butter, room temperature, divided
• 1/3 cup freshly squeezed lemon juice (2 lemons), lemon halves reserved
• 1/2 cup dry white wine
• Sliced lemon, for serving
• Chopped fresh parsley leaves, for serving
Directions
Preheat the oven to 400 degrees F. Line a sheet pan with parchment paper.
Place each chicken breast between 2 sheets of parchment paper or plastic wrap and pound out to 1/4-inch thick. Sprinkle both sides with salt and pepper.
Mix the flour, 1/2 teaspoon salt, and 1/4 teaspoon of pepper in a shallow plate. In a second plate, beat the egg and 1/2 tablespoon of water together. Place the bread crumbs on a third plate. Dip each chicken breast first in the flour, shake off the excess, and then dip in the egg and bread crumb mixtures.
Heat 1 tablespoon of olive oil in a large saute pan over medium to medium-low heat. Add the chicken breasts and cook for 2 minutes on each side, until browned. Place them on the sheet pan and allow them to bake for 5 to 10 minutes while you make the sauce.
For the sauce, wipe out the saute pan with a dry paper towel. Over medium heat, melt 1 tablespoon of the butter and then add the lemon juice, wine, the reserved lemon halves, 1/2 teaspoon salt, and 1/4 teaspoon pepper. Boil over high heat until reduced in half, about 2 minutes. Off the heat, add the remaining 2 tablespoons of butter and swirl to combine. Discard the lemon halves and serve 1 chicken breast on each plate. Spoon on the sauce and serve with a slice of lemon and a sprinkling of fresh parsley
Sunday, May 16, 2010
Seared Tuna Salad - Ina Garten - week 20 of 52
This Ina Garten salad is her variation on regular tuna salad. The recipe is very easy, but beware – if you grill the tuna in a sauté pan, it is quite difficult to clean afterwards. Nothing sticks to pans like cooked fish! You can also throw the steaks on a hot grill to cook.
I would suggest decreasing the amount of salt in the recipe and I added some ponzu (asian citrus-based sauce) to the dressing.
The salad is very rich and filling. Ina suggests serving it at room temperature, but I found the salad too heavy when warm. I refrigerated the salad before eating and found it a little lighter. This was not my favourite recipe from Ina – I prefer my tuna uncooked, in sashimi form.
Bon appétit!
Seared Tuna Salad – serves 4
$$$
Ingredients
• 2 pounds very fresh tuna steak, cut 1-inch thick
• 4 tablespoons olive oil, plus extra for brushing
• 2 1/2 teaspoons kosher salt, plus extra for sprinkling
• 1/2 teaspoon coarsely ground black, plus extra for sprinkling
• 2 limes, zest grated
• 1 teaspoon wasabi powder
• 6 tablespoons freshly squeezed lime juice (3 limes)
• 2 teaspoons soy sauce
• 10 dashes hot sauce (recommended: Tabasco)
• 1 to 2 ripe Hass avocados, medium diced
• 1/4 cup minced scallions, white and green parts (2 scallions)
• 1/4 cup red onion, small diced
Directions
Brush the tuna steaks with olive oil, and sprinkle with salt and pepper. Place the tuna steaks in a very hot saute pan and cook for only 1 minute on each side. Set aside on a platter.
Meanwhile, in a small bowl, combine the olive oil, salt, pepper, lime zest, wasabi, lime juice, soy sauce and hot sauce. Add the avocados to the vinaigrette.
Cut the tuna in chunks and place it in a large bowl. Add the scallions and red onion and mix well. Pour the vinaigrette mixture over the tuna and carefully mix. Serve at room temperature.
Friday, May 7, 2010
Grilled pepper and goat cheese sandwich - week 19 of 52
This week's "Barefoot Contessa" Grilled pepper and goat cheese sandwiches turned out great! "Barefoot Contessa" has a great tip for making grilled peppers that doesn't require an open flame - an oven at 500 degrees will do the same thing!
The goat cheese and grilled peppers, basil and balsamic are classic flavors that go fantastically together! Although takes a little time to make (the peppers need to marinate in the dressing for a couple of hours), well worth it. Perfect rustic sandwich for a lunch or summer picnic!
Bonne appétit!
Grilled pepper and goat cheese sandwiches
$$
Ingredients
• 4 large red or yellow bell peppers, preferably Holland
• 2 tablespoons good olive oil
• 1 tablespoon balsamic vinegar
• 2 cloves garlic, minced
• 2 teaspoon kosher salt
• 1 teaspoon freshly ground black pepper
• 2 tablespoons drained capers
For assembling:
• 1 large ciabatta bread, halved horizontally
• 1 (11-ounce) garlic-and-herb or plain goat cheese (recommended: Montrachet) at room temperature
• 8 to 10 large basil leaves
• 3 thin slices red onion
• Kosher salt and freshly ground black pepper
Directions
Preheat the oven to 500 degrees F.
Place the whole peppers on a sheet pan and place in the oven for 30 to 40 minutes, until the skins are completely wrinkled and the peppers are charred, turning them twice during roasting. Remove the pan from the oven and immediately cover it tightly with aluminum foil. Set aside for 30 minutes, or until the peppers are cool enough to handle.
Meanwhile, combine the olive oil, balsamic vinegar, garlic, salt, and pepper in a small bowl. Set aside.
Remove the stem from each pepper and cut them in quarters. Remove the peels and seeds and place the peppers in a bowl along with any juices that have collected. Discard the stems, peels, and seeds. Pour the oil and vinegar mixture over the peppers. Stir in the capers. Cover with plastic wrap and refrigerate for a few hours to allow the flavors to blend.
To assemble the sandwiches, spread the bottom half of the loaf with the goat cheese. Add a layer of peppers and then a layer of basil leaves. Separate the onions into rings and spread out on top. Sprinkle with salt and pepper. Cover with the top half of the ciabatta and cut into individual servings.
Monday, May 3, 2010
Coming soon - "Barefoot" in May
May will be part of my "chef series", which I'll be calling "Barefoot" in May, dedicated to 4 recipes by Ina Garten. Ina is an American chef who hosts "Barefood Contessa" on Food Network. She left her job in Washington in 1978 to purchase a specialty food store in the Hamptons called "Barefoot Contessa". The store had been named by its original owner in tribute to the 1954 film starring Ava Gardner. Ina kept the name when she took over.
Her style of cooking with features lots of fresh ingredients and her recipes are easy, delicious, and foolproof!
Looking forward to "Barefoot" in May!
Sunday, May 2, 2010
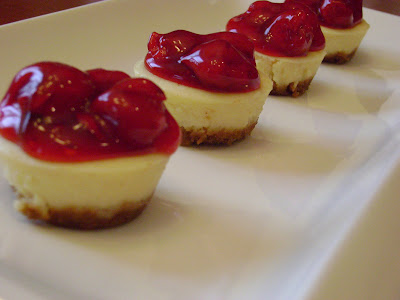
Two-bite New York Cheesecakes - week 18 of 52
I was at the Cheesecake Factory recently and have always wondered what makes their cheesecakes so tasty – after making this Cheesecake Factory inspired recipe, have decided there is only one thing that makes their cheesecakes so tasty – fat. Cream cheese (do not use the low fat type) and whipping cream give cheesecake it’s rich creamy texture!
I made the mini version vs an entire cheesecake – mini makes it cuter, easier to share, bite-sized and you can have more! I’ve included the original Ricardo Larrivée recipe – I halved the recipe and got approx 36 mini cheesecakes. Instead of strawberry topping, I used cherry pie filling. I also added a pinch of cinnamon & cloves to the crust to get a crust which tastes very similar to the Sara Lee frozen cheesecake crust.
Did you know? I learnt that cracks in cheesecakes are a common problem. Here are some tips from other baking blogs:
- Be careful not to open the oven door during the first 30 minutes of baking. Drafts can form cracks and make the cheesecake fall.
- Avoid over-baking which causes the cheesecake to crack. Be aware that baking times are not always exact, due to variations in ovens. Check for doneness at minimum baking time.
- large cheesecakes should always be baked in a water bath since the edges tend to overbake before the center of the cake has reached the temperature necessary to set--coagulate the eggs--to prevent cracking.
When I was making my mini-cheesecakes, I set the mini muffin pan on a cookie sheet and filled it with hot water to reach half-way on the cheesecakes. That trick seemed to work – no cracks on the cheesecake!
As well, when removed from the oven the cheesecake may seem soft in the center - don't worry! It will become firm as it chills.
I shared with friends and co-workers and these mini two-bite NY cheesecakes may be one of the favourites for sure!
Bonne appétit!
New York Cheesecake – courtesy of Ricardo Larrivée
1 cheesecake or approx 72 mini-cheesecakes
$$
Ingredients
Crust
• 1 1/4 cups graham cracker crumbs
• 2 tablespoons sugar
• 1/4 cup melted butter
• Aluminum foil, 46 cm (18 inches) wide
Cream Cheese Filling
• 4 Container (250 g/8 oz each) cream cheese, at room temperature
• 1 1/4 cups sugar
• 4 eggs
• 1/2 cup 35% cream
• 1 tablespoon vanilla extract
Strawberry Topping
• 4 cups whole fresh strawberries, hulled
• 1/2 teaspoon gelatin
• 1 tablespoon cold water
• 1/4 cup sugar
• 1 tablespoon lemon juice
Directions
Crust
1. In a bowl, combine the ingredients. Press lightly into the bottom of a 20cm (8-inch) springform pan. Bake for about 10 minutes. Let cool.
2. Wrap the outside (bottom and sides) of the springform pan with aluminum foil, making sure it’s watertight.
3. Turn the oven temperature down to 170°C (325°F).
Cream Cheese Filling
1. Place all the ingredients in a food processor and pulse until smooth. Pour onto the crust.
2. Prepare a bain-marie: Place the springform pan in a large baking dish. Fill the baking dish with boiling water until it comes halfway up the side of the pan.
3. Bake in the middle of the oven until the filling is set at the edges but the centre trembles slightly when shaken, about 70 minutes. Turn off the oven, leaving the cake inside with the door slightly ajar for 1 hour. Remove the pan from the bain-marie. Remove the foil from the pan. Run a thin knife around the inside edge of the pan. Cover and refrigerate until completely chilled, about 4 hours.
Strawberry Topping
1. Quarter 125 ml (1/2 cup) of the strawberries. Set aside.
2. In a bowl, sprinkle the gelatin on the water and let it soften for 5 minutes. Set aside.
3. In a small saucepan, bring the quartered strawberries, sugar and lemon juice to a boil while stirring. Cover, reduce the heat and simmer gently for 5 minutes. Strain; you should have about 125 ml (1/2 cup) of strawberry syrup. Discard the cooked strawberries. Add the gelatin to the hot syrup and stir until dissolved. Refrigerate until the syrup thickens, about 30 minutes.
4. Arrange the whole strawberries, points facing up, on the top of the cake. Brush the berries with the syrup to glaze them.
Subscribe to:
Posts (Atom)